Wednesday, February 28, 2024

Brutus Monroe - Spring Birdhouse

 Hello!  Thank you for stopping by.  I have such a great card to share with you today.  At least, I think it's pretty great.

BRU2054 Smells Like Spring Stamp Set
BRU2238 Smells Like Spring Coordinating Die Set
BRU2115 Birdhouses
STENCILSUB Gears Galore
BRU6175 Chroma Mist - Merlot
BRU2828 Foil Reactive Embossing Powder
BRU19027 Foil Transfer Sheet - Silver Sketch


I was inspired by Christopher Allen and Candi who recently shared projects made with foil and foil reactive embossing powder.  Smells Like Spring is fixing to retire so I needed to jump on using this set right away while it's still available for purchase and at an amazing price!


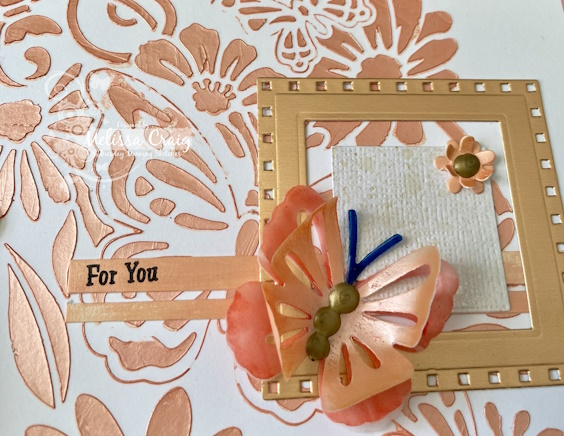
First, I put the Gears Galore stencil on some white card and spritzed and spritzed and then spritzed a little more with Merlot Chroma Mist.  What an amazing color!  Then when that dried I stamped the flowers and added the foil reactive embossing powder and used the Silver Sketch foil in a few places on the background - it didn't work great but that was my fault.  It was a little hard to see!  

I then stamped the birdhouse and colored it using Distress Oxide Inks in Hickory Smoke, Weathered Wood and Black Soot.  I also stamped the flowers and colored using various shades of alcohol markers.  I then used a foil transfer pen and more of the Silver Sketch foil  for a bit more of added shine.  Overall, I am really happy with this card.  I think it turned out lovely.


Tuesday, February 27, 2024

Tuesday Morning Sketches #746

 Hello!  Thank you for stopping by.  I do appreciate your visit.  The latest sketch is up at Tuesday Morning Sketches and I would really like you to think brushstrokes.  You don't have to, but it could be a lot of fun.

My card features Embellishment Mousse from Tonic Studios lovely flowers and sentiment from Brutus Monroe.  The card stock is Dove from Concord & 9th.


I started off with painting Embellishment mousse in gray and pink with a very stiff stencil brush.  You know the kind, the one that looks like my Grandpa's shaving cream brush?  Using this is what allowed for the brushstrokes and in person, this is so amazing and the pink looks pink instead of white.

I heat embossed the flowers with Raven embossing powder from Brutus Monroe and then colored then with the embellishment mousse by thinning it with water and painting.  The leaves I colored with alcohol markers.  The sentiment is from Super Sentimental also from Brutus Monroe.  

The flowers are part of set called Smells Like Spring which is on the Retirement List.  You can get the set and coordinating die set for $26.99!  

I hope you'll join us at Tuesday Morning Sketches and be sure to leave the team some love!

Wednesday, February 21, 2024

Brutus Monroe - Let Your Light Shine

 Hello!  Thank you for stopping by.  I have a card to share with you that I am so proud of!  This turned out better than I expected.  Please visit the Brutus Monroe online shop - unfortunately, at this time, the Wild Lines set is out of stock but crossing fingers it'll be back soon.

BRU3785-2 Wild Lines
BRU1613 Safari
BRU3853 Safari Stripes 4x4 Stencil
BRU1651 Safari Conversation Clippings
BRU4034 Chroma Glaze - Black Pearl
BRU4616 Masking Paper - 4.25"x5.5"


I created this encouragement card featuring the Wild Lines and Safari stamp sets.  Firstly, I created the base layer by slathering on the Chroma glaze through the stencil.  This took some time as the stencil is 4x4 and I'm using a 4x5.25 layer of card stock.  After the first side dried I did the second side and set that aside dry.  Then using various Distress Oxide inks I went about to create this beautifully ink blended background.  Stamped the images onto the background and colored in using black marker to create the silhouettes.  The birds are random dies.  Then I finished off the card by foiling a sentiment from the Conversation Clippings with gold foil.


Did you know that the Brutus Monroe has a great selection of Conversation Clippings and Card Panels that you can foil using Deco Foil and a heat source such as a laminator?  If not, now you do!  The price point is great and they are a great element for your cards!

Thank you again for your visit!


Tuesday, February 20, 2024

Tuesday Morning Sketches #745

 Hello!  Thank you for stopping by.  I appreciate your visit.  The latest sketch is up at Tuesday Morning Sketches.

My card features dies and paper from Tonic Studios.


This was a really easy card to put together by cutting out the panels and layering it all up.  There is no special technique, just layers.

I hope my easy card inspires you to keep it simple this week!  I hope to see you over at the TMS blog and be sure to leave the team some love!

Friday, February 16, 2024

Color My Heart Color Dare #588

Hello!  Thank you for stopping by.  Color My Heart Color Dare #588 is up and ready for your fun and creativity!

This week we've got another Fancy Five challenge...


Use at least 3 - my card is actually featuring 4 of the 5; Sundance, Lagoon, Scarlet and Paprika.  These colors screamed Moroccan to me.  My card also features dies from another Tonic Studios Craft Kit.  The kit actually makes an apothecary box.


The base started with smearing some Nuvo embellishment paste on a panel, then I added some Vintage Drops and the spritzed some sparkle spray in this warm gold shade.  I let that dry and then ran it through an embossing folder.

I then die cut a couple of the patterned dies using Scarlet and Black mirror card.  I stamped the Lagoon square with the stamp that comes in the kit.  The sentiment is from another kit called Time Spent with Friends.  Then I added a lot of Drops - Glitter Drops, Dream Drops and Crystal Drops to decorate.  This card looks like Moroccan tiles, don't you think?

What will you do with these colors?

Wednesday, February 14, 2024

Brutus Monroe - Birthday Bears Shaker

 Hello! Thank you for stopping by.  I have a really cute Brutus Monroe birthday shaker card to share with you.  I love this!!

My card features:

BRU4579 Birthday Bears
BRU8869 Aqua Pigment - Yellow
BRU8883 Aqua Pigment - Blue
BRU8845 Aqua Pigment - Red
BRU6333 Ultra Fine Embossing Powder - Raven
BRU3690 Clear Acetate 4.25"x5.5" Heat Resistant
BRU9033  Aqua Pigment Watercolor Paper


I made a fun shaker birthday card featuring the Birthday Bears stamp set.  But first I started with creating a background by painting stripes onto a piece of watercolor paper using Aqua Pigment in blue and then added some red to make purple.  While that piece dried I went to work on creating the pocket.  I made the shaker pocket by first heat embossing the sentiment onto the acetate, then scoring 1/4" along each edge.  Folding on those score lines and really burnishing those edges.  Once my background piece was dry, I cut it down and sealed it inside the pocket and added some sequins before sealing up the final edge.  I also heat embossed the stamped images onto watercolor paper and did some super easy water coloring.  Aqua Pigments mix beautifully for other color shades.  Blue + Red = Purple and Yellow + Red = Orange.  The bear I watercolored using Distress Ink in Frayed Burlap.


The picture below gets the sequins out of the way so you can see the sentiment.  I just LOVE heat resistant acetate!  It's so fun to use.


I hope you enjoy this card and it inspires you.  Have a wonderful day!!

Tuesday, February 13, 2024

Tuesday Morning Sketches #744

 Hello friends! Thank you so much for stopping by.  The sketch is up at Tuesday Morning Sketches and it's the first new sketch for 2024.

I am totally in love with my card!  This card features items from an old Tonic Studios craft kit that I picked up on clearance.  It came with this gorgeous stencil and some wonderful summer images.  The frame is from iCrafter.


Isn't she lovely?!  She is wonderful!!  Let me tell you how I made this.  I laid the stencil down onto some white card stock and used some Calypso Coral embellishment mousse over the stencil.  This mousse goes on like icing on a cake.  It's lovely.  Then while I had the mousse out I colored some scrap pieces of white card stock and some vellum.  I used the white cardstock that I colored to die cut the flower and the stripes.  The vellum piece I die cut the top layer of the butterfly.  I cut out the butterfly 3 times from vellum.  The bottom layer I colored the antennae using a dark blue alcohol marker.  The middle layer I colored using a dark peach color alcohol marker and the top layer, as mentioned, is colored using the mousse.  The frame is cut from copper metallic card stock.  The little square is a scrap white piece of card stock that was spritzed with Mica Mist - it was left over from another project.


Look at this dimension and gorgeous butterfly!!  It's so so so pretty!

I do hope you'll join us at TMS and be sure to leave a little love.

Wednesday, February 7, 2024

Brutus Monroe - Sweet Notecard

 Hello!  Thanks so much for stopping by.  I'm sharing a fun and super easy notecard...

Stamps:  Salt & Pepper,  Safari and Extra Sentimental


I started by creating my own decorative paper by stamping the flower images from the Safari set followed by the banana leaf stamp.  I colored these in using various Copic markers.  I then trimmed it down and heat embossed the sentiment.

I also heat embossed the Salt & Pepper image with Raven and Bubbly embossing powders.


This is a super easy card and would be easily mass produced.

I hope you like it and helps inspire you to look at those tiny stamps - they can make a big impact.

Tuesday, February 6, 2024

Tuesday Morning Sketches #743

 Hello!  Thank you for stopping by.  Our last revisited sketch is up at Tuesday Morning Sketches and this week's pick is Tammy's favorite pick.  It's a sketch by me and I went super literal with it!

My project (not a card) features dies from Tonic Studios.  I used the flowers from the Blooming Bouquet Box and Luxurious Leaves & Ornate Circle Die Set.  I got them both for a great price (better than what is currently on site).


My favorite flowers are gerbera daisies so I did my best to make a bouquet of gerbera daisies.  I cut 3 of the large size and 2 of the small size and layered these up.  I made some small rolled roses as filler.  The bow is also from the Blooming Bouquet box.  The bouquet wrap is from the fancy circle die.  The shadow box I made myself following a YouTube tutorial.  This was a lot fun to put together.  The flowers look so pretty.  Speaking of pretty... the beautiful young lady to the right of my project is my momma when she was 17.  I'm going to make my her the actual Blooming Bouquet box for Mother's Day.

Well, I hope to see you over at the TMS blog to join in the fun.  Leave the team some love!

Friday, February 2, 2024

Brutus Monroe - Salt & Pepper Valentine Treat Box

 Hello!  Happy Friday.  Thank you for stopping by.  I have a cute little project to share with you along with a little tutorial. 


I am still learning how to stage my photos so I apologize that my little box sort of blends in with the paper.

Here's a little shot with out the rest of the stuff.


This little box features the Brutus Monroe Salt & Pepper stamp and the Be Mine paper pad. 

I started off with my cutting a piece of white card using a 4 inch circle die.  So, yes, I designed this box from top down.


Using my Scor-Buddy, I lined up the circle - this first score line is going to be crucial to help you keep everything going straight.  Score at 7/8" inch.  Rotate fully to score the opposite side at 7/8".  Then rotate to do the middle score line at 1 1/2" inch, rotate again to score opposite side at 1 1/2".

You will then cut on the 7/8" inch side along the score line to the middle score line and notch it out like you see in my photo.  I then cut a circle from the patterned paper that was slightly smaller than the 4" inch circle.  I scored the paper to match the score lines on the white piece and then cut it apart cutting inside the score lines so that it is slightly smaller to layer on the white piece.  I hope that makes sense. Then glue the sides middle flap in.  I use Bearly Art glue for everything, but you can use tape if you prefer.

From here I made the box.  I measured the inside rectangle of the box which is the top part of the lid and then reduced that measurement by 1/8" so that the bottom of the box fit inside the lid I made.  


My finished sized bottom is 2 3/8" x 3".  I cut out the notches (see photo) and then cut patterned paper to dress up the box front, back and sides.  The front and back measure 2 1/2 by 2 3/4 and sides measure 5/8" x 2 3/4" glued the box together.

Once my box was done, I stamped the S&P stamp and cut out using another circle die and matted with a scallop die.  Stamped the sentiment and trimmed it.  Once you get the basic construction done, you can make these really quick.  I used to make little treat boxes for my sister's students so this would be super easy to mass produce.  

Products Used:

BRU8692 BE Mine paper
BRU8807 Salt & Pepper
BRU2543 Raven Detail Ink
BRU2524 Alabaster Pigment Ink

Color My Heart Color Dare #586

Hello!  Thank you for stopping by.  Color My Heart Color Dare #586 is up and ready for your fun and creativity!


This time we have a Fancy Five challenge - use at least 3 colors.  My card features all 5!  We are also collaborating with Double Trouble, however, my card doesn't fit that challenge.  But it's still cute...


For this card I started the base by using a stencil and some Solar Paste.  This has a gold hue to it, see part of the card on the left side.  My card also features a Small Die of the Month die from Spellbinders - a floral layer die.  I cut the base of the flowers in Ballerina and detailed them with Candy Apple.  The foliage in Jade, the bluebell in Bluebird and those tiny flowers in Periwinkle.

I'm working on building up my birthday card stash!  I hope to see you over at Color Dare!