Tuesday, January 4, 2022

Tuesday Morning Sketches #638

 Hello! Thank you for stopping by and Happy New Year (once again)!  The first revisited sketch is up on Tuesday Morning Sketches and it was Andrea's pick.  She chose one of my CAS sketches and it's a great one to kick off 2022 because it's a good one to use up scraps or supplies that you haven't used in awhile.

My card features another rainbow!  I looked back on when this sketch was originally published and I made a rainbow card then. That's so funny, I didn't even realize.


I did flip the sketch for a landscape card.  The diagonal lines, I just used my Scor-Buddy to do some scored lines.  No stash busting for me.

Before I get into the details of my sketch, I want to give credit where it is due.  This is not an original card idea.  My fellow i-Crafter Inspiration Team member, Amanda Stevens, actually created a card very similar.  I loved it!  I told her I was going to copy it.  You can see it here on her blog.

The card features dies from i-Crafter, Shadow Happy Birthday and Shadow Hello Friend.  I cut the shadow part of the sentiment from Holographic card stock that's from Simon Says Stamp, then I cut the inside letters from black card stock and inset that, then cut one more time from white and layered that on top slightly off.  The "happy" came from an old stamp set from Hero Arts.  Then I had fun with my Nuvo Drops in many shades.  The rainbow, I did cut that from white card stock and the colored with Copics.

Here's a tip on how I put the rainbow together.  I cut a scrap of white sticker paper and adhered the little sections of the rainbow to the sticky side of sticker paper.  It's inexpensive ink jet sticker paper so it does have some wiggle room.  Once I had the sections on it, I used my bone folder to burnish it to make sure these pieces were really stuck.  Then I trimmed the excess sticker paper away.  Made it really easy to work with these small pieces.

Well, that's it.  I hope to see you over at the TMS blog and you'll join in the fun.  Be sure to visit the design team, too.  They'd love to hear from you.


Saturday, January 1, 2022

i-Crafter Release Day!

 Hello and Happy New Year!  I hope that 2022 is a year of great improvement.  In fact, I think that's going to be my word for the year.  Improvement.  

Anyway, it's release day at i-Crafter and I am so excited to share my project with you.  It was rather a difficult project to photograph because of the gold foil card stock.  I'm saying that ahead of time so you'll be prepared.  LOL


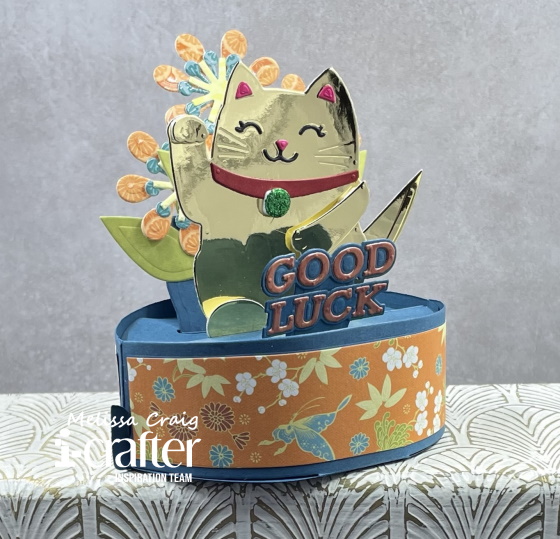
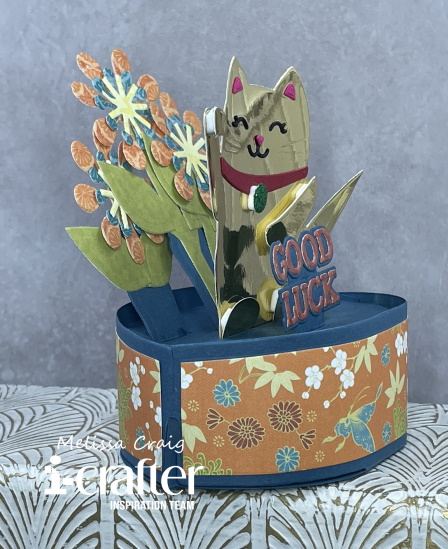
Isn't this cute!  This is Box Pops Lucky Cat Add-On.  This is a fun, new addition to be used in conjunction with the Box Pops, Oval Base.  When I saw this set, I immediately thought of the adorable lucky cat statue in my favorite Chinese restaurant.  Maneki Neko aka lucky cat is a Japanese symbol thought to bring good luck and fortune to households and businesses.  So it's absolutely perfect for the New Year!  Although, I see me using this cat to wish good fortune and blessing for all kinds of occasions.

I pulled out my gold foil card stock and set to work on creating this 3D card.  I have to admit, I struggled.  This was my first time putting this box together.  It does take a little practice.  But I'm sure I'll get the hang of it.

The base die set comes with two inserts for the slots - one cuts a slot in the middle and the other cuts is slightly off side.  I cut that one twice, so that I had to offside slots in the back for my flowers.  Let me give you a tip.  When cutting your base, I highly recommend using 110 lb cardstock or doubling up so that your pieces for the inserts stand up straight.  Also, it helps to have a low humidity room - which I do not.  By the way, I used the i-Mend Self Mending MAGNETIC PRO Deck.  Let me tell you, this deck is a game changer!  It is out of stock but watch for it when it becomes available again.  You will want to get your hands on this!  It cuts like butter and beautifully every time!  The magnets are super strong, virtually eliminating the need for tape to hold your die in place.  Highly recommend this tool.


As you can see, my inserts are wanting to fall to the back.  But still, it's cute and I think it will be enjoyed by the recipient anyway.

 And maybe if you have some Christmas money to spend, head on over to the i-Crafter shop and surely would appreciate it if you'd use my affiliate link.

Tuesday, December 28, 2021

i-Crafter - You spin right round baby, right round....

 Hello!  Thank you for stopping by!  I'm on the i-Crafter blog today sharing this little baby....


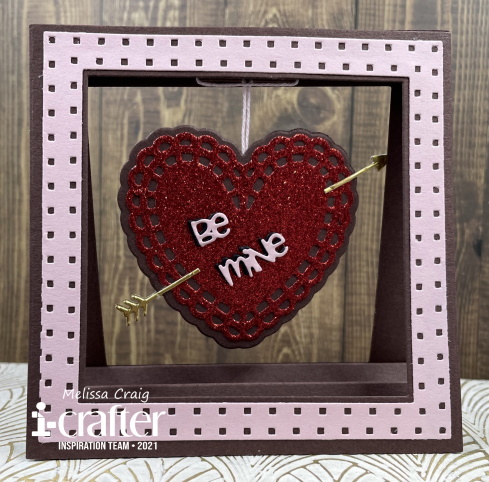
This fun 3D, it stands, it spins, it folds flat for mailing features some fun new dies.  Heart Embellishments by Lori Whitlock, Classic Squares and Dashed Squares by Lynda Kanase.  I do admit that this was inspired by a popular YouTuber who recently shared another company's spinning cards.  Well, I watched that video for about 3 minutes and then shut it off.  I knew that was something I could do!  So I pulled out my dies, my papers and my Scor-Buddy.

I cut the base out using two different sizes of the Classic Squares.  I then I cut a frame using the Dashed Squares, this is how I cut the dashed dots on both edges.  I then cut a piece of card stock that was the same length as the base and 3 inches and scored every 1/2 inch and accordion folded it.  Then adhered to both bottoms.  I made a top piece that's only about an inch or so long that 2 inches wide and then scored at 1/2 inch and also accordion folded.  I also punched a little hole in it to feed the string through.  Then I die cut my elements.  The dies are perfectly symmetrical so they went together back to back super easily.  I sandwiched the string between the hearts and then decorated.  Super easy to do!  This will fold flat for mailing, but I highly recommend a padded envelope.  

Thank you for your visit!

Tuesday, December 21, 2021

Tuesday Morning Sketches - Annual Anything Goes

 Hello!  Thank you so much for stopping by.  It's time for the Annual Anything Goes challenge at Tuesday Morning Sketches. This is the time of year where we, the TMS team, get 2 weeks off to recharge, spend the holidays with our loved ones and get ready for the new year.

My card features the Rocker Step Card base from i-Crafter.  I did share the bird from this set on a card a few weeks ago but I had made it a bluejay instead of a cardinal.  This time, I made a stark white card with an embossed panel, white poinsettias and the majestic red cardinal.


I do wish this picture looked as good as this card does in real life.  I couldn't get the blue to tone down.  Looked perfect at first.

This card was so fun to put together, but I admit, it's not a quickie card.  Of course, I was watching Hallmark Christmas movies while making it so it probably prolonged the process.

Please join us at Tuesday Morning Sketches for our anything goes challenge.  There is a prize!

Tuesday, December 14, 2021

i-Crafter meets Tuesday Morning Sketches (#636)

 Hello!  Thank you for stopping by.  The latest sketch is up at Tuesday Morning Sketches.  Did I say latest?  I meant last sketch... yep it's the last sketch for 2021.  It's by Andrea and it's super easy going and super fun!  And I decided i-Crafter needed to come along for this ride!

My card features Shadow Happy Birthday by Lynda Kanase and Heart Embellishments by Lori Whitlock.  This is a super easy card and when I made this I actually had one of my bosses in mind.  He's Indian and what screams India to you?  Well, to me (besides the amazing food) is the colors!  It's his birthday today, and although I didn't send this to him, in my mind its still for him.


It's is a very simple card with lots of color.  That large sentiment is perfect as it's own focal point.  It's one piece so you run through your die cut machine twice and there you go, two cards, boom!

I do hope you'll join us at Tuesday Morning Sketches!  We'll see you there.

Tuesday, December 7, 2021

Tuesday Morning Sketches #636

 Hello! Thank you for stopping by.  I appreciate your visit.  The latest sketch is up at Tuesday Morning Sketches and it's brought to us by Debbie.

My card was super easy!  I pulled out some dies (as I usually do) and some old Christmas paper pads.  Actually the paper pads were out because I'm making 7 of the Double Carriers by i-Crafter for my sister.  So I just put more of the paper to good use.


The ornament was made using a die from i-Crafter (Double Carrier set) and a die from Spellbinders (also featured last week).  The white panel I embossed using a cover plate from Kat Scrappiness.  The Merry Christmas sentiment is from Pink and Main.  The sentiment I actually cut into both the white layer and the patterned paper layer.  Then cut out a few more and did a bit of inlaid die but with dimension.  I lost the dot to the "i" so I improvised with a dot of Nuvo Drops red.  I also added a dot Nuvo Drops Silver Lining to the snowflake (snowflake die is also from Spellbinders).  I pulled out some baker's twine that I've had in my stash for a pretty long time to finish of my red and white card.  The paper does have some foil shininess but as you know, I have know clue how to capture that in a photo.

Please head on over to the TMS blog and join us!  We'd love it if you did.  Thanks!!

Wednesday, December 1, 2021

i-Crafter Release Day!

 It's the 1st of the month and that means it's release day at i-Crafter.  There is so much to offer in this month's release. 

I am featuring the Gable Box by Lori Whitlock!  I know!  It's Valentine's Day themed and we, as crafters, have to work on our projects early so we're ready for the special occasion or holiday.  But I know what you're thinking, especially if you've been following me for awhile or know me personally - I am not into Valentine's Day.  But this box is so pretty and is so versatile.  I'm thinking more like this would be a fabulous favor box for a wedding.


How to make this box. 

1.  Cut the base of the box twice. 

2.  Cut the front/back decorative panels twice.  Also the side decorative panel (not pictured).  I did cut the back on solid and embossed and the front one I centered that beautiful filigreed heart, embossed the main piece and then glued the heart back in.

3.  Adhere the panels to the box. 

4.  Assemble box using your favorite adhesive.  Mine is liquid glue by Bearly Art.  

5.  Cut out tag and use the words that come in the die set or personalize.


I hope you enjoy this box and if you'd like to purchase it, I'd appreciate you using my affiliate link.